Hanging a tarp shelter well is mostly about choosing the right shape before the weather chooses it for you. This tarp shelter configurations guide shows the practical setups worth learning, when to use each one, and the small pitching details that stop a cheap sheet of fabric turning into a flapping blue disaster. If you can get the ridgeline tight, the corners angled and the opening out of the wind, a tarp becomes one of the most flexible bits of UK camping kit you can carry.
In This Article
- What You Need Before You Pitch a Tarp
- Tarp Shelter Configurations Guide: The Main Setups
- How to Hang a Tarp Between Trees
- Pitching a Tarp with Walking Poles
- Choosing the Right Configuration for UK Weather
- Common Tarp Pitching Mistakes
- Packing, Drying and Storing Your Tarp
- Frequently Asked Questions
What You Need Before You Pitch a Tarp
A tarp shelter looks simple because it is just fabric, cord and pegs. The catch is that every weak point is exposed. A tent hides a lot of mistakes with poles, sleeves and fixed geometry; a tarp makes you build the geometry yourself.
For most UK campers, a sensible starter kit is:
- A 3m x 3m tarp: the best all-round size for one person with gear or two people sitting/cooking under cover. Budget tarps start around £20-£35 on Amazon UK, while better nylon or polyester camping tarps from Decathlon, DD Hammocks and Alpkit are often £45-£90; the Alpkit Rig 7 is a useful mid-range example.
- Six to eight pegs: take more than the minimum. Basic steel pegs are cheap but heavy; decent Y-beam aluminium pegs are usually £10-£18 for a pack.
- Two main guylines: 3-5m each for the ridgeline or main pull-outs. Reflective cord is worth it because tripping over black cord at 11pm is a poor hobby.
- Four corner guylines: short adjustable lines with tensioners make life easier in rain.
- Two walking poles or tarp poles: if you cannot rely on trees. Budget tarp poles cost about £20-£35 a pair; walking poles do double duty on the hill.
- A groundsheet or bivvy bag: unless you are using the tarp as a cooking/admin shelter rather than sleeping cover.
The tarp itself should have reinforced tie-out points, not just thin eyelets punched through plastic. A builder’s blue tarp will work for a festival day shelter, but it is noisy, bulky and awkward in wind. For camping, I would rather buy one dark 3m x 3m tarp from Decathlon or Alpkit than save £10 and fight a crinkly sheet all weekend.
Size and fabric choices
A 2m x 3m tarp is fine as a minimalist solo cover, but it gives little margin for wind-driven rain. A 3m x 3m tarp is the safer first buy. Larger 3m x 4.5m tarps are brilliant for group kitchens and family camps, but they need stronger anchors and more space.
Nylon packs smaller, polyester stretches less when wet, and cheap polyethylene is bulky but tough for car camping. If pack weight matters, compare tarps the same way you would compare the options in our best ultralight tents guide: weight only matters after weather protection and durability are good enough.
The one knot worth learning
You do not need a scouting badge to hang a tarp. Learn a bowline for a fixed loop and use a trucker’s hitch or simple tensioner for tightening the ridgeline. If your guylines have Line-Loks, even better. The real skill is getting tension even across the tarp, not collecting knot names.
Tarp Shelter Configurations Guide: The Main Setups
The best tarp setup depends on wind direction, rain angle, sleeping arrangement and how much headroom you need. Do not pitch the same shape every time. A still summer evening, a wet Dartmoor forecast and a breezy lakeside pitch ask for different shelters.
A-frame
The A-frame is the default configuration: ridgeline down the middle, two sides sloping to the ground. It is the easiest tarp shelter to understand and the best place to start.
Use it when:
- You want balanced rain protection: water sheds from both sides.
- You are sleeping under the tarp: it gives a clear central space for a mat or bivvy.
- You have two trees or two poles: it works either way.
Pitch it lower in wind and higher in fair weather. For sleeping, I like one long side dropped close to the ground and the other side lifted slightly for access. That gives protection without turning the shelter into a sealed condensation bag.
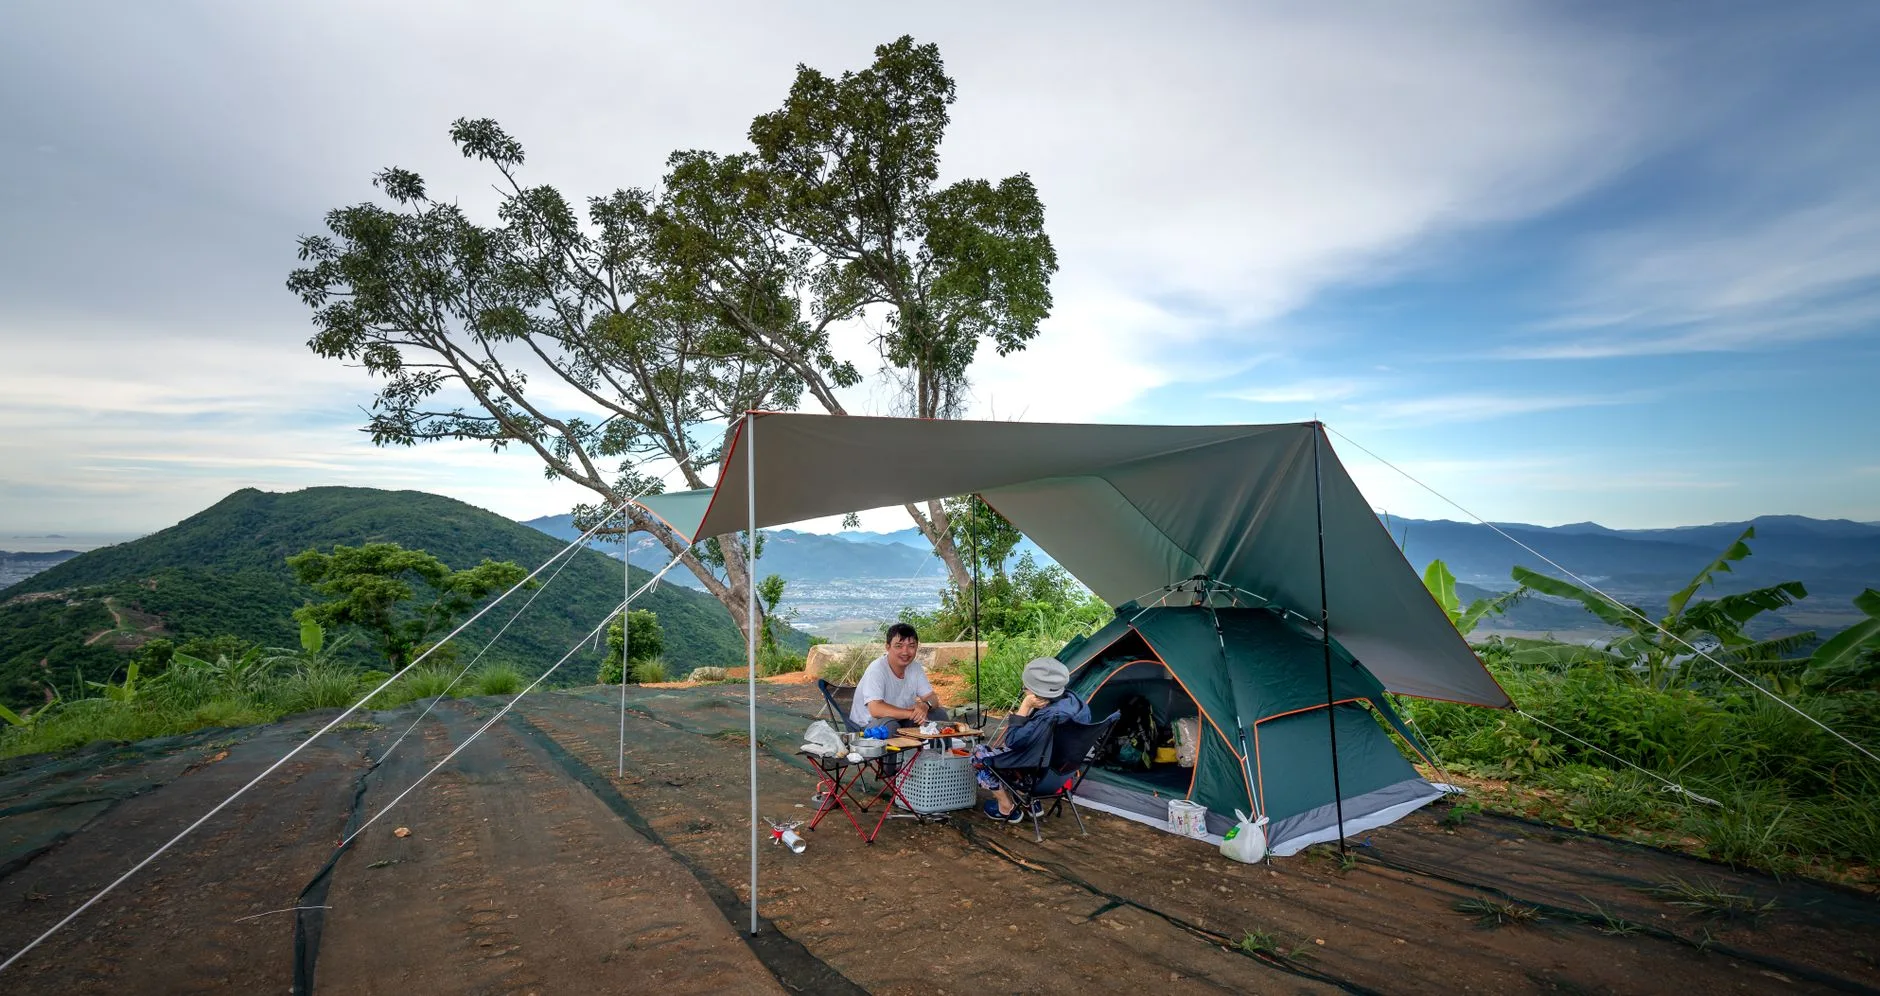
Lean-to
A lean-to is open on one side and low on the other. It is great as a cooking shelter, lunch stop or view-facing camp cover, but it is poor if the wind shifts overnight.
Best when:
- You want a daytime admin shelter: cooking, sorting wet kit or sitting out rain.
- The wind is predictable: put the low back into the wind.
- You want headroom: it feels roomier than an A-frame.
The mistake is pitching the open face into rain because the view is nicer. Nice view, wet sleeping bag. Point the open side away from the weather first, then worry about scenery.
Plough-point
A plough-point uses one high corner and three lower corners, creating a diagonal shelter. It is fast, compact and good with one tree or one walking pole.
Choose this when:
- You need a quick solo shelter: one high point, three pegged corners.
- Wind is coming from one direction: point the low back into it.
- You have limited space: woodland edges and small pitches suit it.
It gives less usable sleeping width than an A-frame, so check your mat position before tightening everything. I have seen people pitch a lovely plough-point, then realise their feet stick out into the rain.
Diamond fly
A diamond fly hangs the tarp diagonally over a hammock or sitting area. It gives good coverage from a square tarp and works neatly between two trees.
It suits:
- You are covering a hammock: diagonal coverage follows the hang.
- You want a fast shade/rain fly: fewer peg points than some shapes.
- You have a square tarp: the corners line up naturally.
The weak spot is side coverage. If rain is blowing sideways, drop one edge lower or switch to a tighter A-frame.
Low storm pitch
The low storm pitch is not glamorous. It is the setup you use when the forecast looks ugly and staying dry matters more than sitting upright. The ridgeline is low, sides are close to the ground and guylines are short.
Save it for:
- Wind is the main problem: lower profile means less flapping.
- Rain is blowing sideways: edges close to the ground help.
- You are sleeping in a bivvy bag: low clearance is acceptable.
Check the Met Office UK weather warnings before committing to exposed tarp camping. A tarp is versatile, but it is not a magic shield against high winds on open ground.
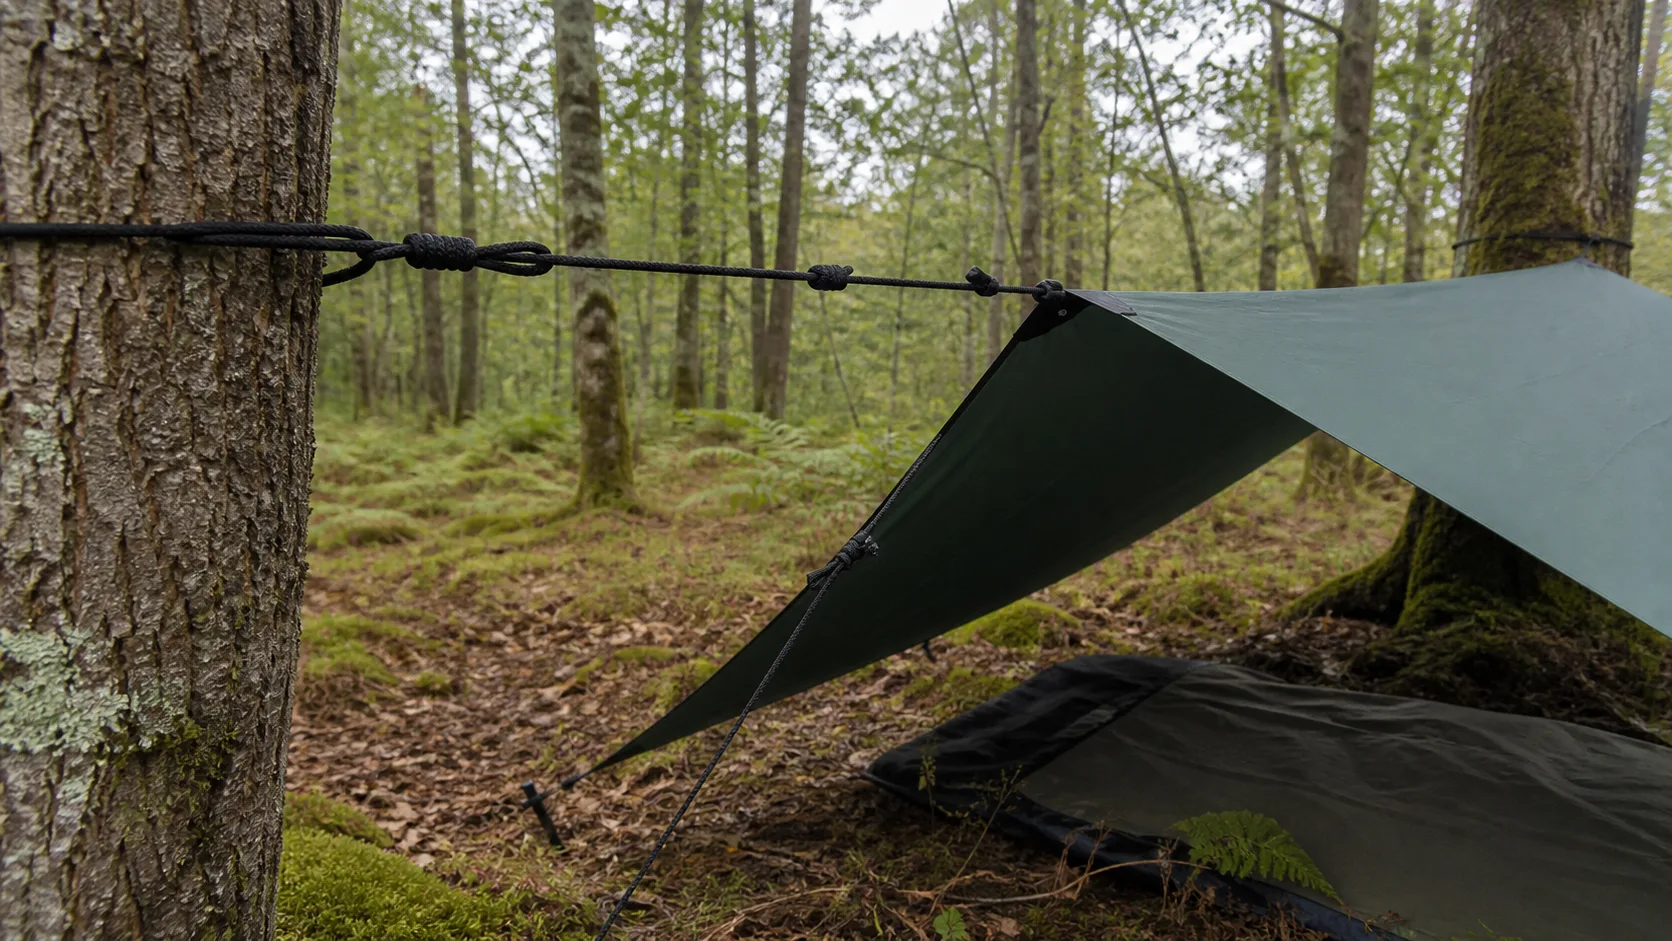
How to Hang a Tarp Between Trees
Trees make tarp pitching easier, but only if you choose them carefully. You want healthy trees, not dead branches, shallow roots or trunks so far apart that your ridgeline sags like washing day.
Pick the right trees
Look for two sturdy trees roughly 3-5m apart for a small tarp. Avoid dead standing trees, cracked limbs and obvious widow-makers overhead. In UK woodland after rain, also check the ground. A perfect ridgeline over a boggy hollow is still a bad pitch.
If you are camping on private land or a managed campsite, use trees only where allowed. Protect bark by using wider webbing straps or wrapping cord carefully rather than sawing thin cord back and forth around the trunk.
Set the ridgeline
Tie one end of the ridgeline at about chest height for a normal A-frame. Run the cord around the second tree and tension it. The ridgeline should be firm, not guitar-string tight. If it bows heavily before the tarp is attached, it will sag more when wet.
There are two common approaches:
- Tarp over ridgeline: the ridgeline sits under the tarp. This supports the fabric well but can let water run along the cord unless you add drip lines.
- Tarp under ridgeline: the ridgeline sits above the tarp and the tarp hangs from it. This sheds water better but can put more strain on tie-outs.
For beginners, tarp over ridgeline is simpler. Add short drip lines under the tarp edge if rain starts tracking along the cord. A drip line is just a small piece of cord tied to the ridgeline so water runs down it before reaching your sleeping area.
Peg the corners
Peg the windward side first, then tension the sheltered side. Put pegs in at roughly 45 degrees, angled away from the pull. In soft ground, use longer pegs, rocks, buried sticks or a deadman anchor. If a peg pulls out once, do not just hammer it back into the same loose hole.
This is where campsite choice matters. Our guide to choosing a camping spot by terrain, wind and water goes deeper, but the tarp version is simple: high enough to avoid pooling water, sheltered enough to reduce gusts, and flat enough that you do not slide out from under cover.
Pitching a Tarp with Walking Poles
Walking-pole tarp pitches are brilliant on open ground, moorland edges and campsites without useful trees. They also ask more from your guylines because the poles are freestanding supports rather than fixed anchors.
Pole height
For a comfortable A-frame, set poles around 110-125cm high. In wind, drop them to 90-105cm and widen the stance. A high pitch feels airy, but it catches wind and lets rain blow underneath. A low pitch is less comfortable but far more secure.
Place pole tips into reinforced tarp points or use the handle end if the tip risks damaging fabric. Some tarps have dedicated pole cups; if yours does not, be gentle. A £60 tarp can be ruined quickly by a sharp carbide tip.
Guyline angles
The main guylines should pull away from the pole in line with the ridge. Side guylines should pull the fabric out, not down into wrinkles. If the tarp forms diagonal creases, move the peg rather than just yanking harder.
Use two guylines on each pole in wind if you can. It takes extra cord, but it stops the pole rocking side to side. On hardstanding or rocky ground, you can anchor to rocks, logs or filled dry bags, but test them before trusting your shelter overnight.
Cooking under a tarp
A tarp makes a good cooking shelter because it is open and ventilated, but be sensible. Keep flames away from fabric, use a stable stove base and avoid cooking right beside sleeping kit. If you use gas, a stove windshield costs about £8-£15 and makes a bigger difference than most fancy cooking accessories.
For stove safety and bad-weather meal setups, pair this with our guide to pitching a tent in bad weather and the stove-specific pieces elsewhere on CampGearUK. The shared principle is shelter first, then cooking comfort.
Choosing the Right Configuration for UK Weather
UK weather is rarely dramatic in one clean direction. It drizzles sideways, changes wind after midnight and makes grass wetter than it looked at 6pm. Your tarp pitch should assume change.
Rain
For steady vertical rain, an A-frame is the safe default. Keep the ridgeline tight and the sides low enough that splashback does not reach your sleeping area. For heavy rain on sloping ground, point one end slightly downhill so runoff moves away from your mat.
Do not pitch in a hollow. A tarp can stop rain from above, but it cannot stop water flowing along the ground. If the ground is already wet, a groundsheet with raised edges or a bivvy bag gives useful backup.
Wind
In wind, go lower, shorter and simpler. The low storm pitch beats a high lean-to. Point the smallest face into the wind, shorten guylines and use stronger pegs. If the tarp is cracking and snapping, it is too loose or too high.
If strong winds are forecast, I would choose a tent or move to sheltered ground. Tarps are brilliant in moderate weather, but a dedicated tent with poles and a shaped fly is easier to trust when the forecast gets ugly. Our how to camp comfortably in the rain guide covers the wider wet-camp routine.
Condensation
Tarps ventilate better than tents, but a low pitch over damp ground can still collect condensation. Leave a small gap on the leeward side when conditions allow, and avoid breathing directly into a sealed corner. If your sleeping bag brushes the tarp, move the mat or raise the pitch slightly.
Midges and insects
A tarp does not stop midges. In Scotland, by lakes, or in still woodland, add a bug net or bivvy with mesh. Budget head nets cost about £5-£10; inner mesh shelters cost more, often £50-£120, but can save a trip. This is one reason tarps suit some people more than others.
Common Tarp Pitching Mistakes
Most tarp failures are not caused by the tarp. They come from weak angles, poor site choice and rushing because rain has started.
Pitching too flat
A flat tarp collects water. Even a small hollow can turn into a sagging bowl. Give every setup a slope so rain has a path off the fabric. If you want more headroom, raise one side rather than making the whole tarp flat.
Ignoring wind direction
Face the low side into the wind. If the opening faces the wind, the tarp becomes a scoop. This is especially bad with lean-tos and plough-points. Before pegging, stand still for 30 seconds and feel where the breeze is actually coming from at ground level.
Using weak pegs
Thin round pegs twist and pull out in soft ground. Upgrade to Y-beam or V-profile pegs for main load points. For family or car camping, heavier steel pegs are fine. For backpacking, carry a mix: longer pegs for main corners, lighter ones for secondary points.
Over-tightening one corner
If one corner is cranked tight and the opposite corner is loose, the whole tarp twists. Tension gradually: ridgeline first, windward corners next, then leeward corners. Walk around the shelter and adjust until the panels look smooth.
Setting up too close to the fire
Sparks melt tarps. Even small pinholes become leaks. Keep fire, stoves and lantern heat well away from fabric. A tarp shelter can be a cooking cover, not a fireplace roof.
Packing, Drying and Storing Your Tarp
A tarp is low maintenance, but wet storage ruins coatings and makes the next trip miserable. Shake off water, wipe mud from the corners and pack it where it will not soak your sleeping bag.
At home, dry it fully before long-term storage. Hang it over a washing line, banister or garage rail. Do not leave it compressed in its stuffsack for weeks while damp. The same storage logic applies to tents, and our how to store a tent between trips guide covers the mould and coating side in more detail.
Folding or stuffing?
Stuffing is quicker in the field and avoids permanent crease lines. Folding is neater at home. I stuff on trips, dry at home, then loosely fold or roll for storage. Keep guylines attached if they are not tangled; just wrap them neatly so the next pitch does not begin with a cord puzzle.
Repairs and seam care
Carry a small repair patch and a few spare metres of cord. Tenacious Tape or similar repair patches cost about £7-£10 and can save a trip. If a seam starts weeping, clean and dry it before using seam sealer. Do not smear sealant over mud and hope for the best.
A tarp is at its best when you treat it as a system: fabric, anchors, site choice and weather judgement. Get those right and it becomes a porch, kitchen, rain shelter or minimalist sleeping cover in one small bag.
Frequently Asked Questions
What is the easiest tarp shelter configuration? The A-frame is the easiest setup for most campers. It works between trees or walking poles, sheds rain from both sides and gives a clear sleeping space underneath.
What size tarp is best for camping? A 3m x 3m tarp is the best first size for UK camping. It gives enough coverage for one person with gear or two people sitting under shelter without becoming too hard to pitch.
Can I pitch a tarp without trees? Yes. Use two walking poles or tarp poles as supports, then peg the ridgeline and corners securely. Lower the pole height in wind and use stronger pegs on the main guy points.
Is a tarp better than a tent? A tarp is lighter, more flexible and better ventilated, but a tent gives more bug protection, privacy and all-round weather security. For harsh weather, most campers are better with a tent.
How do I stop a tarp sagging in rain? Use a tight ridgeline, add enough slope for water to run off, and retension guylines after the fabric gets wet. Polyester stretches less than nylon when soaked.
Can you cook under a tarp shelter? You can cook under a tarp if there is plenty of ventilation and the stove is well away from fabric. Keep flames low, use a stable base and never treat the tarp as a fire shelter.